Tuesday, August 25, 2015

The Rising Demand for PeopleSoft Integration in the Public Sector

The Rising Demand for PeopleSoft Integration in the Public Sector

In the past two years Calance has seen a growing demand for integrating PeopleSoft with project controls systems.  This demand is particularly noted in the public sector, as public entities are seeking to manage capital projects and programs in more rigorous and accountable ways than the past practice of multiple, unrelated systems and spreadsheets.  

There are a myriad of methods for tracking project and program health including: schedules, funding allocations and expenditures, contracts and changes, facilities conditions, and document turnaround times.  The tools for tracking such things are also diverse, and include a number of products in the Oracle Primavera family such as Primavera P6, Contract Management (PCM), and Unifier.   But the tools also extend to other Oracle products such as Hyperion, other commercial systems such as Maximo, and systems such as home-grown applications and of course the ubiquitous Excel!

This trend to standardize program and project health metrics is driven by demand for more accountability and transparency in the use of public funds.  And such accountability and transparently ultimately benefit organizations which are seeking public funding.  It is not always easy for public organizations to adapt new tools and practices, but it is essential to their long-term success.

How does Calance fit into this dialog of transition and improvement in the Public Sector?  For many years, we have been working with many public entities, helping them to implement and integrate project controls systems, going back to their first work with the Los Angeles Unified School District in 2004.  In that project we integrated Primavera Expedition with a home-grown solution, and helped to automate management of P5 (later P6) projects and baselines.    Since then we have worked with a number of other school districts, including San Diego and New York, taking best practices and turning them into automated data integrations which improve data quality and turnaround times, while enhancing use of best practices across the organization.

Our in-house product, the Dimension Integration Framework has been fundamental to this success.  Dimension allows us to bridge data across multiple systems, not only for data integration, but also for automation of tasks.  For example, using Dimension automation, we have streamlined contractor payment processes for clients.

Dimension is a very mature product.  First created in 2001 for integrating Primavera with JD Edwards, is has undergone continuous improvements since then to meet the needs of our current customers, adapting far beyond the first systems integrated to include many more.  We do not let Dimension sit still, but take advantage of improved technology as software techniques and hardware capabilities advance.  Today, Dimension is capable of many things, from performing simple point-to-point field mapping to advanced mapping operations which can handle thousands of active projects across multiple databases. Dimension has also adapted to work with in-house or cloud-based systems, making it ideal for integrating PeopleSoft with the latest project control system from Oracle Primavera - Unifier.  But that is a topic for another post.

Until then, may your data serve your organization, not vice versa!

Boulder, CO
Aug 2015


Friday, July 31, 2015

Invoices and Vouchers - disambiguation and some advice on how to Get Invoices into PeopleSoft

When integrating Invoices with PeopleSoft a number of terms are bandied about, and there is much confusion about the words Voucher and Invoice.  In this write up I want to clarify some things about how PeopleSoft treats Invoices.

An excellent description of Vouchers versus Invoices  is here: http://www.accountingcoach.com/blog/difference-invoice-and-voucher

In summary:

Invoices are received by Purchasers, and are issued by Vendors.  Vouchers are internal documents created by Purchasers to track and record Invoices.

So these two items are different sides of the same coin.  Now enough with the general items, let's talk PeopleSoft.
In PSFT the actual item is called a Voucher.  The Voucher system is basically a PeopleSoft module for making payments to vendors.  

There really are no AP Invoices in PeopleSoft.  Instead, there are Vouchers.  Which makes sense, since PeopleSoft is our system and we are Purchasers. (The Royal we, meaning all of our clients who are users of PeopleSoft, and for whom we do this integration work.)

There are a few fields that are always required on a Voucher.
  • VENDOR_ID
  • VOUCHER_ID
  • INVOICE_ID
  • INVOICE_DT

VENDOR_ID - Of course if you are going to pay someone you must know who that person is!  Vendors in PeopleSoft are entities that you can send money to. Such entities can include city governments, subcontractors, prime contractors, and suppliers.

VOUCHER_ID - This field is unique to each record in PeopleSoft .  When you enter a new Voucher, PeopleSoft will generate a VOUCHER_ID for you if you like.  It will simply take the next available number in the system.  You may also send PeopleSoft your own number if you wish.  We often do this in integrations when the integrated Vouchers need to clearly stand out from standard ones.  Generally we add a prefix onto these, so a Voucher_ID would look something like "DIM00001" rather than something like "00000001".  Since this number must be unique within PeopleSoft, it can be a bad idea to force this to match a number from another system unless you can guarantee that the number is unique.
But if, for example, you have set up Primavera Unifier to make sure that Invoices are unique across the whole system, you could use those as your Voucher number.  However, this is not standard practice.

When you ask someone in AP to look up a voucher, the best pieces of information you can give them are Vendor ID and Voucher ID.   This lets them quickly and unambiguously find a specific Voucher.

INVOICE_ID - This field is 30 characters long and can contain any standard characters.  PeopleSoft does NOT populate this field.  Instead, the user must provide a value.  It is required and cannot be blank.  A specific INVOICE_ID value also cannot already be used for a given vendor.  This means that VENDOR_ID and INVOICE_ID must be unique.   This field is often used to replicate the number provided on a vendor's invoice.  That numbering system is usually unique to a vendor. For example, the invoice number on a Home Depot receipt will have nothing to do with the invoice number from an Amazon order.
An integration can generate an INVOICE_ID, but this is sometimes not desirable, mainly because INVOICE_ID is usually prominently displayed on a printed Invoice.

INVOICE_DT is  the date of the invoice.  Like INVOICE_ID, this is generally supplied  by the vendor on their written Invoice.  PeopleSoft does not generate this  value.

All this is to drive home three points:

  • The INVOICE_ID and INVOICE_DT cannot come from PeopleSoft.  They either must come from an external source such as Unifier, or we must establish some algorithm for generating these values.
  • The  VOUCHER_ID is created in PeopleSoft (when letting it generate the number automatically), and should be written back to the external system.  Even if we decide to create it from the external system, writing it back will explicitly show us that the Invoice exists as a Voucher in PeopleSoft and gives us a clear number to give to AP people if we have questions about a specific Voucher.
  • We must know which vendor an Invoice is written to, and that ID must come from the external system.

I hope this helps to clarify how Invoices are used in PeopleSoft with regards to integration with external systems such as Primavera.

Boulder, CO
July 2015


Saturday, July 18, 2015

Weblogic NodeManager port 5556 conflicts with VideoStream for Chromecast


I was installing the latest version of Primavera Gateway on my home machine last weekend and ran into an issue where WebLogic would not start.  The problem is that NodeManager is set to run on port 5556, and  I kept getting messages that another program was using that port.
Here is the message:

<Jul 18, 2015 6:13:29 PM MDT> <SEVERE> <Fatal error in NodeManager server: The server is unable to create a server socket for listening. The address localhost might be incorrect or another process is using port 5,556: java.net.BindException: Address already in use: JVM_Bind>

I ran the following command line to see which process had the port:

> netstat -abnp TCP 

The result:

  TCP    192.168.1.6:5556       0.0.0.0:0              LISTENING
 [chrome.exe]


Why would Chrome be using a port?  It turns out that this was not Chrome directly, but an extension I use which allows me to stream movies from my desktop to my Chromecast (Surprisingly, even if a movie can play fine on your PC, Chromecast will not always recognize it. But Videostream can play almost any format).


I went to Chrome->More Tools->Extensions and  found the culprit:
Now I just happend to get lucky searching on 5556 and Chrome and found articles mentioning port 5556.  If I had not found that, then I would have had to try disabling every extension until it worked.  One work around was to just turn Chrome off completely.  But it's hard for me to get anything done without Chrome :) 

Sunday, February 1, 2015

Simple and Cheap Ikea-based Standing Desk

Cheaper and Easier Ikea-based Standing Desk

There are many Ikea hacks out there to make standing desks, of variable quality and simplicity.  Here is what I consider to be one of the best, made for about $70.  If you have an office with a number of employees, and don't want to blow your coffee budget on furniture, this is the best bargain out there.  It uses a basic Ikea table, and then simple plumbing hardware from Home Depot.  It is light, fast to set up, adjustable, and requires very little in the way of tools or skill.


Start with a basic Linnmon table top with Adils legs.  We use the ones that are 59 inches long and 29.5 inches wide, in the Birch color.  Legs are silver.

Table Top:  Linnmon $18

Legs: Adils 4x $4 each = $16


Just these items alone comprise a basic desk with lots of space to work with.  If you don't need a standing desk, this is a great deal at about $35.  It is 29 inches high.


Now let's take it to the next level!  We are going to raise this table by 12 inches to make it 41 inches, which is a pretty good height for a standing desk.  Using this technique it is also very easy to adjust the height to 39, 42, or whatever works best for you.

Go to Home Depot (or your favorite hardware place), and purchase the items in the image below:


Four 2 foot lengths of 1.5 inch Schedule 40 PVC pipe
Four 1.5 inch end-caps
Four 1 foot lengths of 1 inch PVC pipe (I actually got one section of 1 inch by 10 foot PVC pipe and had it cut there)

The 1.5 inch lengths are actually sold in 2 foot lengths at my local Home Depot, which makes this part easy.  The 1 foot lengths of 1 inch pipe were not sold separately, so I bought a 10 foot section.  I figure I can use this to adjust legs or convert more desks, or use it in my garden for irrigation!

How much does all of this cost?  Why only $27.04

If you cannot have the 1-foot pieces cut in the store, you can use a PVC cutter tool to cut them yourself.  This is much easier than using a hack saw.  The tool costs about $6.50 at home depot, and is wonderful if you do PVC work.


Next turn your table upside down (this is easy as the table is very light).  And slide the 1.5 inch pipe over each leg.


It should fit snugly, but with enough room to slide it down the pipe.  Before you slide it all the way, drop in a 12 inch section of the one inch pipe.  This is what determines the height of the standing desk.  These four 1 inch sections are what the original Adils legs rest on.  Then end caps cover the 1.5 inch pipe so that the open pipe does not dig into the carpet.


Do this on each leg.  If it's too tight, don't worry, just get them on, and then turn the table over and use your weight to push them so that they are snug.

Here is the final product.  I did not know what to do with the existing desk, so just put this over it, which fits surprisingly well.


If you want to adjust the desk height, just use your PVC cutter to create four more sections.  Remove the legs and replace the 12 inch ones with the ones that best suit you.

I did not have the hardware to get the monitors off of the desk (major waste of space!).  But here is a photo of the basic idea.  Just get two short bracket rails and a shelf.  Also from Home Depot.


There you go!  $50 for the Ikea table, which works great by itself as a non-standing desk, then $27 more to stand it up.


Happy hacking!

Sunday, November 17, 2013

Using Log4net in C# - Quick start guide (and reminder to myself!)

I use logging in virtually every app I write. Even if it is just a simple proof of concept, or even if I'm tweaking someone else's code, the first thing I do is hook in log4net. This is a mature, lightweight logging framework which is easy to configure and easy to turn on and off.

And yet - I still do not remember all the steps needed to get it up and running, and hence this blog - a place for me and hopefully others to go to get log4net up and running so we can get onto more important tasks.

Installation and Setup

These days I usually use nuget to install log4net. You can also get it from Apache. It consists of one dll of 292kB.
The minimum steps needed to get it working are:

  • Reference the log4net.dll 
  • Add a line to AssemblyInfo.cs 
  • Declare a logger in each class 
  • Add logging statements 
  • Modify the .config file as needed - this is where the magic happens! 

You can also consult this very good setup summary by Justin Rhinesmith here

AssemblyInfo.cs

In AssemblyInfo.cs, add the line:

[assembly: log4net.Config.XmlConfigurator(ConfigFile="log4net.config", Watch = true)]

This tells your program to call the default configurator for log4net, use the file "log4net.config", and watch the file for changes. You could leave out the ConfigFile, in which case it would use the application's app.config file. I long ago decided that I would just use the same filename "log4net.config", for all my applications. Then I can simply copy over this file anytime I needed it. So far, this has worked out well and I tend to re-use the same settings 90% of the time.


Note that if you want to use the app.config file you still need to update AssemblyInfo.cs with:

[assembly: log4net.Config.XmlConfigurator(Watch = true)]

Also note that you can call the configurator explicitly in your code. I have found that this just does not work as well as declaring it in the assembly. In particular, declaring in the assembly means that you put that exact same line in assembly.cs for console, windows, ASP.NET and Service applications.

Using it in your code


Next, let's add logging to the code. Here is the basic code:

public class MyClass {
  static log4net.ILog log = log4net.LogManager.GetLogger(System.Reflection.MethodBase.GetCurrentMethod().DeclaringType); 

  public void Foo () {
    log.Warn("This is a Warning message");
    log.Info("This is an Info message");
    log.Debug("This is Debug message");
  }
}

GetLogger takes either a Type or a String. In this case, I am using reflection to get the type of "this" class.
I really like this way of doing it, since, it means that this same line can be cut and pasted into any class,
and will not need to be edited.

The log is also static, since I don't want to waste time and resources instantiating one in each instance of my class.

Next, I make calls to the logger, as in:

    log.Info("This is an Info message");

There you go. Now the code will send log information to log4net. So what happens to the information? Where does it go?  The very nice thing at this point is that where the log info goes is no longer in the application's hands. You don't  have to change any code to set or change where it goes.

Configuring log output


Log4net can be configured in the app.config file, within the code itself, or from any xml-formatted file. I like to just call my file log4net.config and be done with it.
My favorite log4net.config file can be found here.  I'm not including the text directly in the interest of saving space.  Feel free to copy it from GitHub!

This looks like any other config file for .Net. First a configuration handler is defined. Then comes the actual log4net configuration.  We add an appender, which can be defined as "a thing which takes log messages and puts them somewhere".  I will list my 3 essential appenders:  Trace, Console and RollingLog

TraceAppender

I work in Visual Studio, and so want  to see my log output in the Debug Output window.  The Trace Apender does that:

    <appender name="TraceAppender" type="log4net.Appender.TraceAppender" >
      <threshold value="DEBUG"/>
      <layout type="log4net.Layout.PatternLayout">
        <param name="ConversionPattern" value="%-5p %m%n" />
      </layout>
    </appender>

I generally want to see everything in this trace.

ConsoleAppender

The ConsoleAppender simply outputs messages to the console.  Many of my apps are console apps or have some form of console mode.   There is even a color-coded console appender if you want to get fancy.

 <appender name="ConsoleAppender" type="log4net.Appender.ConsoleAppender" >
      <threshold value="INFO"/>
      <layout type="log4net.Layout.PatternLayout">
        <param name="ConversionPattern" value="%-5p %m%n" />
      </layout>
 </appender>

I generally put the threshold to Info here, so that it does not show the verbose Debug messages.

RollingFile Appender

For persistent diagnostics, you want to log to a file. But what file? What happens when the file gets large? Log4net's file naming options take care of the first question, and the RollingFileAppender takes care of the second.

<appender name="RollingFileAppender" type="log4net.Appender.RollingFileAppender">
  <threshold value="DEBUG"/>
  <file type="log4net.Util.PatternString"
        value="%appdomain_%property{log4net:HostName}.log"/>
  <lockingModel type="log4net.Appender.FileAppender+MinimalLock" />
  <layout type="log4net.Layout.PatternLayout">
    <conversionPattern value="%date %-5level: %message%newline" />
  </layout>
  <rollingStyle value="Composite"/>
  <datePattern value="yyyyMMdd"/>
  <maxSizeRollBackups value="100"/>
  <maximumFileSize value="15MB"/>
</appender>

The file name is set in the <file> tag.  It basically gets the name of the executable itself and  the machine name.  So if my program is called foo.exe, running on Bombur, the file will be named "foo.exe_Bombur.log"  The file also rolls, meaning that if it exceeds a certain size, then it will rename the current log file and start a new one.  You can tell it how far to back up before deleting old log files, as well as how large to let those files get.  With the settings above, I generally have enough history to find recent issues, and the files are small enough to be read easily.

Log4net Debugging

But what if you don't see any messages? This is a concern about using a 3rd party logging system. If it does not work, how will you know?  The answer is that you can turn on log4net's own built-in debugging by putting the following into app.config:

<appSettings>
  <add key="log4net.Internal.Debug" value="false"/>
</appSettings>

<system.diagnostics>
  <trace autoflush="true">
    <listeners>
    <add name="textWriterTraceListener"
    type="System.Diagnostics.TextWriterTraceListener"
    initializeData="C:\log4net_internal.log"/>
    </listeners>
  </trace>
</system.diagnostics>

In the appsettings you tell log4net to run its internal debugging. If you run from the console you'll see many messages as log4net created repositories, adds appenders, and sets various properties. However, if you are debugging an ASP.NET application, you won't have a console. But the good news is that log4net's messages are emitted as trace calls. So you can add a tracelistener, such as a simple TextWriter in the example above. Now you'll see the messages in your log file.

This should be sufficient to find out what is going wrong.

However, if you still are getting no logs, then you can also just run from the debugger and step into the log4net code itself. It is all available in the download, and if you want to, you can even modify it yourself!

Summary

This was  intended to be a simple introduction to log4net, and a reminder to myself of the basocs.  I hope it helps to show how simple it is to use, and how easy it is to add the benefit of logging to your development experience.

Thursday, March 21, 2013

Primavera P6 Database Install and Case (in)sensitive Passwords in Oracle 11g

Primavera P6 Database Install and Case (in)sensitive Passwords in Oracle 11g

Recently while at a client we were running through the P6 installer to create a new P6 database on Oracle 11g.  This usually goes smoothly, as long as all of the connection information is entered correctly.  But this time we hit a snag.
We entered our connection information had the dba enter the secret admin password. Then we got an error:


SQLException: ORA-01017: invalid username/password; logon denied

What's going wrong?  It seemed we were entering everything correctly, but it simply would not connect.

First, we verified that we could ping the database server.  Yep, worked fine.
Next, we ran tnsping to see if we could see the database.  Yep, that worked too.
Then we ran SqlPlus from the command line, using the same server/SID and same user and password.  Again, everything worked fine.

We used the same connection information in the P6 setup dialog as what we verified with SqlPlus.  This was quite a mystery.  Now it's not uncommon for someone to fat-finger the password, or to mis-type the server or SID.  But we had two people working on it and double checked, triple checked, nothing!

Then we asked around at the client if anyone had seen this kind of behavior before.  Sure enough, someone asked if the system password was all uppercase or not.  No, it certainly was not, because who would ever have a password with only uppercase characters?  Well, it turns out that until 11g, oracle database passwords were ALWAYS stored as uppercase.  I did not know that.

Usually you would not know this because the various components that connect to an Oracle database know to convert the password you enter into uppercase before sending it to Oracle, and silently do so. And this is exactly what was happening.  The components used by dbSetup for the underlying database connection were taking the password we entered, translating it to uppercase, and that password was being rejected by the server.

Our immediate workaround was to have the dba change the password to all uppercase.  A terrible solution, but we were pressed for time, and just needed that connection once to create the database.

In the light of the next day, I found a better solution.  Oracle allows you to wrap your password in double quotes, which causes the password to be passed directly, with no translation to uppercase.  This is the better solution by far.

So - why did this catch us unawares?  Well, this is a new feature in 11g, and the case-sensitivity must be explicitly turned on.  The XE client is still 10g, so it's not possible to have this issue during routine laptop installs of P6.  And our clients who have recently upgraded to 11g have not enabled this feature yet.

A really good article explaining the new case-sensitive password feature in 11g can be found here:

http://www.oradba.ch/2011/02/case-sensitive-passwords-and-strong-user-authentication-2/


Well, another day, another lesson learned.  And the overall lesson is that with software you just never know what's coming around the corner.  Even though we install Primavera P6 routinely, when we get to a client it is rarely routine.  Certain parts get smoother every time, but you never can tell what differences you'll find until you attempt the install on a specific system.


Wednesday, February 27, 2013

Timberline Address Book bug Introduced with 2012 year-end update to Accounting 9.8

Timberline Address Book bug Introduced with 2012 year-end update to Accounting 9.8

In December 2012 one of our Timberline/Primavera integrations customers applied the year-end update to Timberline 9.8 Accounting system.  Over the next few weeks they noticed that some emails on Address Book companies were blank - even though they had been set in the past.  It was hard to notice, and no pattern was visible.
Just this week (Feb 26, 2013), our client found out what was happening.  It is a bug introduced with that year-end update.

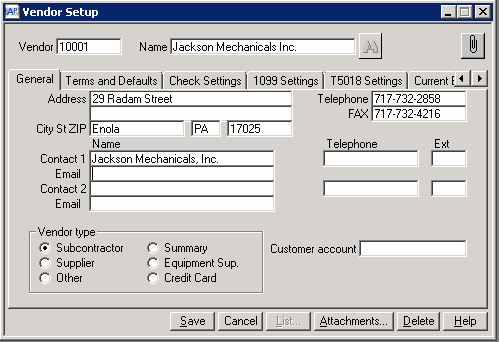
The bug is related to the new ability to add an email address to an AP vendor.  In AP there are now two email fields, as you can see in the screens below.

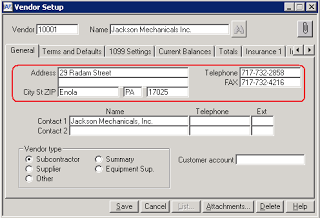
In the old AP, there was just Contact 1 and Contact 2, and each had a  Name, Telephone and Extension (left image).
In the new AP there is now an Email as well (right image).


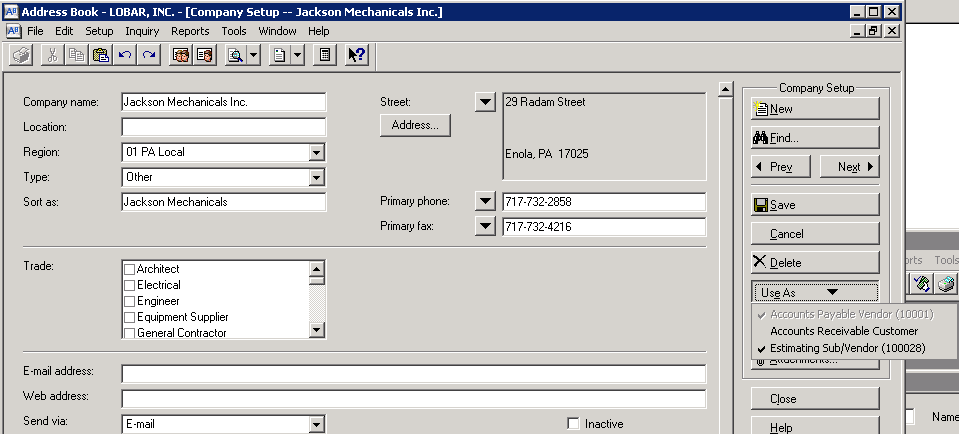
The issue is that this email on Contact 1 on the AP Vendor  is strongly tied to the email on the Address Book (AB) Company for that vendor.  You can see the AP Vendor that the AB Company is associated with (if any) by opening up the AB Company and viewing the "Use As" link.  If there is an AP Vendor, it will be checked and the number will be shown in parentheses.


If a change is made to the AP Vendor, then that email - and just that email - overwrites whatever email has been set on the AB Company.

Here is the major problem - since that AP Vendor email field is new, it is always blank.  This means that if you update your AP Vendor in any way, you are also overwriting the AB email to be blank!  If the AP Vendor email is set to a specific address, that address too will overwrite the AB email.

Since we have clients who use Timberline regularly, and who rely on these email addresses being correct,  we have a fix for this, which should serve as a patch until Timberline fixes it themselves.

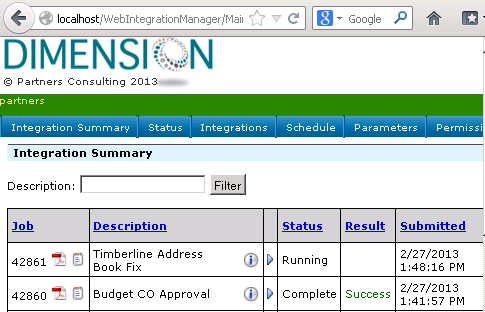
This fix is part of our Dimension Integration framework.  Since we have many integrations which work with Timberline, we were able to quickly develop this fix.  This integration module does the following:

It searches all AB Companies, and finds their matching AP Vendors, if any.  Then if the AB Company email is not blank and the AP Vendor email is blank, it updates the AP Vendor with the AB Company email.  This way, when someone updates the AP Vendor, the value being written back to AB is the correct value.

Of course this is just a stop-gap solution.  You should be able to enter one email for AP, and another for AB, and the two should not be tied together like this.  But until this is fixed, at least our clients can move ahead.